Guide to set up Outlook after email transition: Windows
After your email is transitioned, please follow the below steps to update Outlook to connect to your transitioned mailbox. Alternatively, you can download and run the email transition utility to perform the below steps automatically.
Note: Following the transition, users will need to configure any other non ontariotechu.ca accounts they set up with Outlook before the transition.
Step 1: Select the Windows button.
![]()
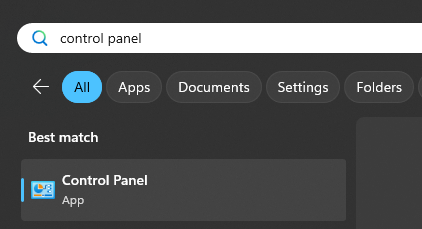
Step 2: In the search bar, search for and select Control Panel.
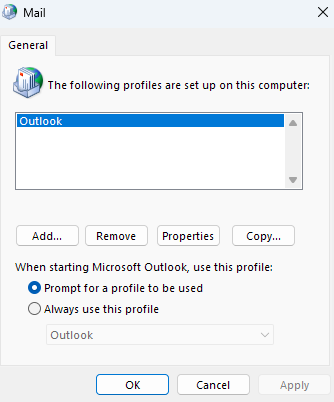
Step 3: Select Mail (Microsoft Outlook).
![]()
Step 4: Select Show Profiles….

Step 5: Select Prompt for a profile to be used and select OK.
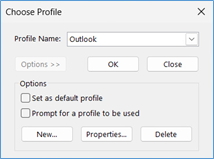
Step 6: Open Outlook.
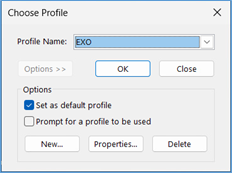
Step 7: A Choose Profile prompt will appear. Select Options and then select New.
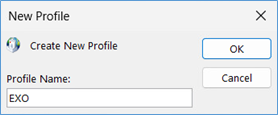
Step 8: Enter EXO as your new Profile Name and select OK.
Step 9: Outlook will display a prompt with your email address pre-filled in. Select Connect.
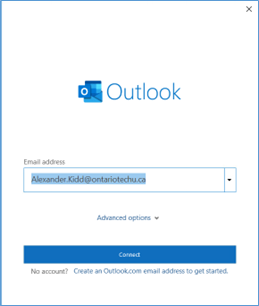
Step 10: If a Microsoft sign-in screen appears, fill in your @ontariotechu.ca email address and select Next.
The screen may be pre-filled with 100xxxxxx@oncampus.local. If so, delete that information and enter your @ontariotechu.ca email and account credentials. Select Sign in.

Step 11: If prompted to sign in, enter your Banner ID and network password. Select Sign in.

Step 12: After successfully adding your mailbox. Select Done.

Step 13: Back on the Choose Profile dialog, check the box for Set as default profile and select OK.
For any issues, please reach out to the IT Service Desk.