Network drive: Moving university files to the T: drive
Overview
Please note: The following information only applies to Ontario Tech faculty and staff.
Throughout March, Information Technology (IT) Services team will be transitioning all university files from the shared S: Drive to a dedicated Ontario Tech T: Drive. This move will be help to enhance our institutional data management and security infrastructure and will ensure proper management of university records.
Our team will continue to provide updates and support throughout this infrastructure improvement project. At this time there are no required action to be completed, but following the transition you can follow the below guides to access your files in their new location.
For more details about the network drive migration, please direct all inquiries to ask.IT@ontariotechu.ca.
Timeline
In order to minimize disruption to university operations, this move will occur from Friday, March 14 to Friday, March 28.
Steps to follow
While there are no required action to be completed before the migration, after the transition, we recommend following the below best practices:
- Update shortcuts and links as you encounter them.
- Create new shortcuts directly to the T: drive locations.
- Update any documented procedures that reference the S: drive.
Support
Should you have any questions after the transition, please reach out to the IT Service Desk.
-
Guide for accessing files after network drive transition
After the transition you will notice that everyone S: drive path has now been moved to a T: drive path.
Example:
Pre transition = S:\Department\file.xlsx
Post transition = T:\Department\file.xlsx
If you wish to access your files after the transition, please follow the below instructions.
Step 1: Check the current file path, it maybe be showing showing (S:).
Step 2: Navigate to the same location on the T: drive.
Step 3: Bookmark or create shortcuts to the new location.
For any issues, please reach out to the IT Service Desk.
-
Guide to updating your desktop and file explorer shortcuts
If you receive this screen shot when trying to update your desktop and file explorer shortcuts, please follow the below instructions.
Step 1: Right-click the broken shortcut.
Step 2: Select Show more options.
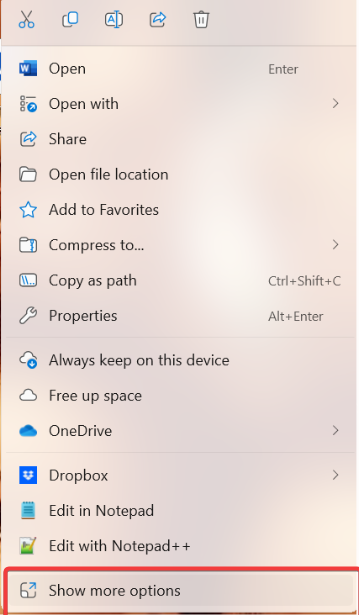
Step 3: Select the arrow to scroll down. Select Properties.
Step 4: In the Target field, locate where it says S: and replace the S: with a T:
Step 5: Select Apply and then Ok.
Step 6: Once complete, reopen the shortcut and confirm it goes to the correct location.
For any issues, please reach out to the IT Service Desk.
-
Guide to updating hyperlinks in word documents
If you want to update the hyperlinks included in Microsoft Office documents (Word, Excel, PowerPoint), there are two methods to do this. Follow the below steps to update the hyperlinks.
Method 1: Direct Link Editing
Step 1: Right-click the linked object (text, image, chart, etc.)
Step 2: Select Edit Link or Edit Hyperlink.
Step 3: In the Address field select the drop-down arrow.
Step 4: Select the S: drive path.
Step 5: Now change S: to T:
Example:
Pre transition = S:\Department\file.xlsx
Post transition = T:\Department\file.xlsx
Step 6: Click OK and save the document
Method 2: Find and Replace (for multiple links)
Step 1: Press Ctrl+H on your keyboard to open Find and Replace.
Step 2: In the Find what: field, enter the S: drive path.
Step 3: In Replace with: enter the same path with T: drive.
Step 4: Select Replace.
Note: If you want to replace all the file paths at the same time, please do so with caution. It's recommend to do this one by one to avoid any issues.
Step 5: Save the document
Note: These methods work across Word, Excel, and PowerPoint but some options may appear differently depending on your Office version. Make sure to save your document after making any changes.
For any issues, please reach out to the IT Service Desk.
-
Guide to updating Quick Access links
To resolve broken Quick Access links after the move, unpinning the old shortcut and pinning the new location is the simplest solution. Windows does not support directly editing the path of pinned folders in Quick Access, but here's how to fix it.
Step 1: Unpin the broken shortcut.
Step 2: Open File Explorer (Windows button + E).
Step 3: Navigate to Quick Access in the left pane.
Step 4: Right-click the broken shortcut (pointing to S:\filename\foldername) and select Unpin from Quick Access.
Step 5: Pin the Updated Folder.
Step 6: Navigate to the new location T:\filename\foldername.
Step 7: Right-click the folder and select Pin to Quick Access.